One of the most exciting things about the new 1RC Racing Cars is the size. The size of these cars allows you to build your very own race track at your house, at your shop, or almost anywhere you want. You can invite your friends and family over anytime and have fun racing each other. Also, you and your friends can build your own tracks and start a racing series to have more fun.
So the next question is: How do you Build Your Own Track? Well, we have some information below that will help you with this. All of the information below is just a suggestion on how to build a simple and basic track. You can be as creative as you wish. Once you build your track make sure to post pictures to our social media sites to give other racers ideas.
Before you start, please be sure to follow all recommended safety instructions on the tools you use to build your track. Always be sure to wear safety glasses and take your time.
Step 1:
First, decide where you will want to build your track. The smallest track we suggest is around 12' x 24' with a 3' wide racing lane. You can obviously make it larger or smaller depending on your available space. Keep in mind, the larger you can make your track the more cars you can run, so if you plan to run a lot of cars at once try and maximaze the size of your track. Be sure your area is fairly smooth. The track we show you below is a no-pile carpet surface and is not attached to the floor so you can easily disassemble the track when not in use. This no-pile carpet works well for the racing surface but you can also run the cars on most painted shop floors or other surfaces. The reason for the no-pile or no-nap style carpet is, if you have to much pile or nap the cars can wonder very badly since the cars are so small and light weight To see if the surface will work for your track, simply run the car on the surface you are looking at and see how it works, you will know right away if the surface will work for your track. One suggestion, if you have a smooth concrete garage floor and the car is a little loose or wants to spin out, try mopping the floor. Even a well swept smooth concrete floor still has dust and could make the car loose coming out of the corners. Try mopping the floor and then try running the car again to see if that surface will work.
We recommend you sketch your track out on paper with dimensions and that will help you determine how much of each material listed in Step 2 your will need. Having a plan on paper will help you for sure.
Please note, the information below is for the 12' x 24' track we mentioend above. If you track is larger or smaller adjust the cut lengths as needed to fit your track.
Step 2:
Hardware List (your list will vary depending on how you might want your track to look and the size you choose)
- No-Pile Carpet
- When you are looking at the carpet, ensure you get a no-pile carpet. This is critical as the pile in carpet will make the cars drive weird and not track straight. Most hardware stores have some version of indoor/outdoor carpet and some do have a pile rating, if you run into this look at the back side of that carpet. Most of the indoor/outdoor carpets have a smooth and no-pile backing that works well. If you have trouble finding no-pile carpet at your local hardware store, look at your local carpet store or boat shop, standard indoor/outdoor boat carpeting is no-pile carpet in most cases.
- Most carpet comes in 12 foot wide rolls. Get the length you need to fit your space.
- Most hardware stores have this carpet in gray and brown, if you want your track to look more like pavement track we recommend the gray and if you want a more dirt track look you can go with the brown.
- 4' x 8' x 1/8" White Covered Hardboard
- This will be used to make the inside of the corners for your track.
- 1" x 4" Board
- This will be used to make the outside wall on the straightaways.
- 2" x 4" Board
- This will be used to support the 1x4 outer straightaway walls.
- 24" x 48" x 0.093" (3/32") or 0.125" (1/8") Polycarbonate Sheet
- This will be cut into 4" wide strips and used to make the outside wall in the corners.
- 2" Long Standard Wood Screws
- We recommend some standard countersink phillips head wood screws that are 2" long. These are used to secure the 1x4 to the 2x4 on the outer walls.
- 2" Wide Velcro Brand Plastic Hook and Loop
- This will be used to join the polycarbonate strips of the outer corner walls together and also to attach the outer corner walls to the straightaway walls.
- Small Bricks or Paver Stones
- These are used to help keep the outer wall shape and help keep the straightaway wall from moving.
- Paint - Red and White - Optional
- This is an optional step but we think is a great addition to your track. This will be used to paint the walls as shown in the images below. You can choose any colors you prefer.
Tools Needed
- Safety Glasses
- Cordless Drill
- Skill Saw
- Jig Saw
- Utility Knife
- Scissors
- 1/8" Drill Bit
- File or Sand Paper
- Dust Mask
- Tape Measure
- Masking Tape
- Long Ruler or Long Straight Edge
- Pencil or Marker
Before you start, make sure to follow all recommended safety instructions on all the tools you use to build your track. Always wear safety glasses and take your time and be safe.
Step 3:
Now that you have all the items you need, let's start building that track. Roll out the carpet in the space you have choosen for the track. Since the carpet was likely rolled up for transport, you may need to let the carpet rest to flatten out.
Step 4:
Now that you have the carpet laid out, start building the outer straightaway walls. If your track will be the 12' x 24' we mentioned above, use the dimensions below for the cut lengths of the 1"x4" and 2"x4" boards (Figure 4a). Then, assemble the boards as shown in Figure 4b. You will need two(2) of each board assemblies to build the front and back straightaway outer walls. Figure 4c represents an optional feature to help support the straightway walls. If you track is bigger or smaller, adjust the cut lenghts to match your track size.
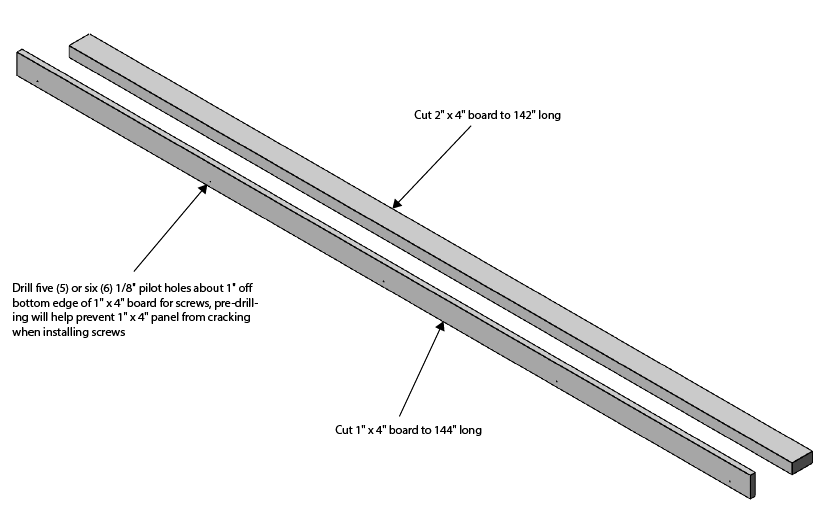
Figure 4a
------------------------------------------------------------------------------------------------------------------------------
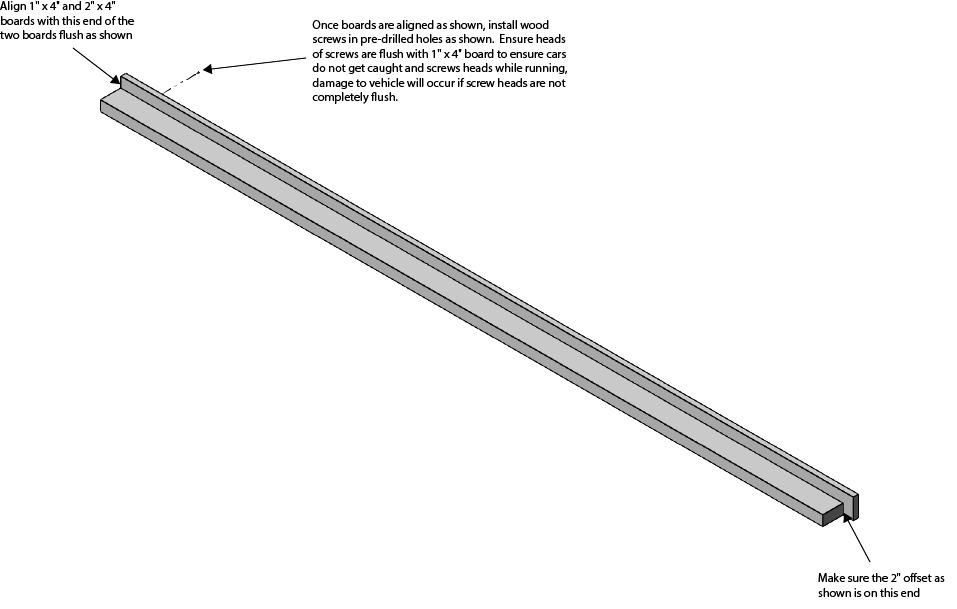
Figure 4b
----------------------------------------------------------------------------------------------------------------------------
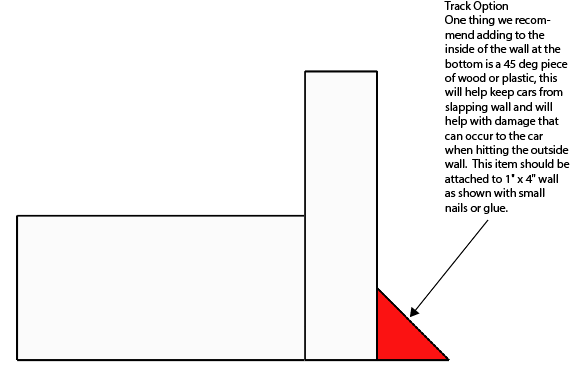
Figure 4c
---------------------------------------------------------------------------------------------------------------
Once you have these straightaway walls assembled, now is the time to paint them. After the paint has dried, set these on the long sides of the carpet about 2" in from the edge of the carpet and centered end-to-end as shown in Figure 4d.
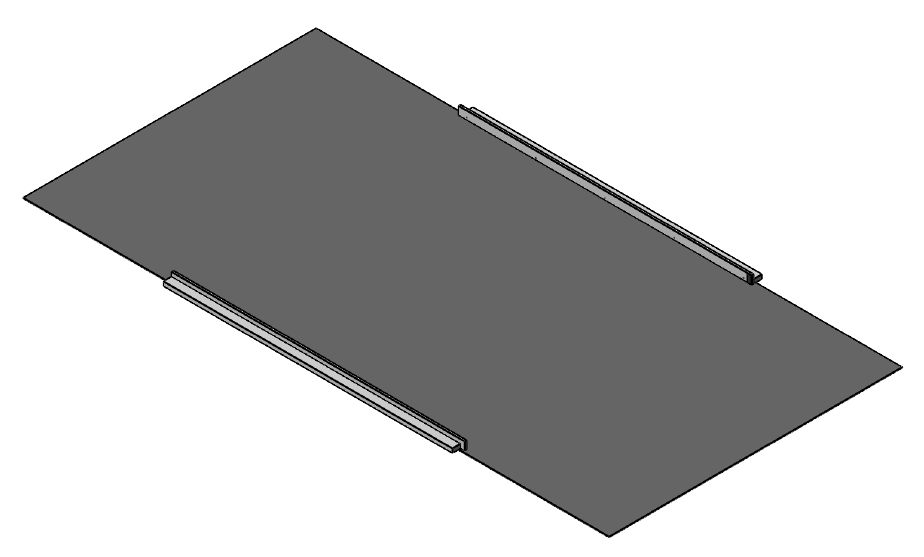
Figure 4d
Step 5:
For the outer corners, you will need to take the polycarbonate sheets and cut strips that are 4" wide x 48" long. Cut ten (10) of these strips. Once these are cut you paint all these strips on what will be the outside surface of the wall. After these are completely dry, you will need to take the 2" wide Velcro Branded Plastic Hook and Loop and cut 4" wide pieces and apply as shown in Figure 5a. Ensure you pay attention to the hook side and loop side in Figure 5a.
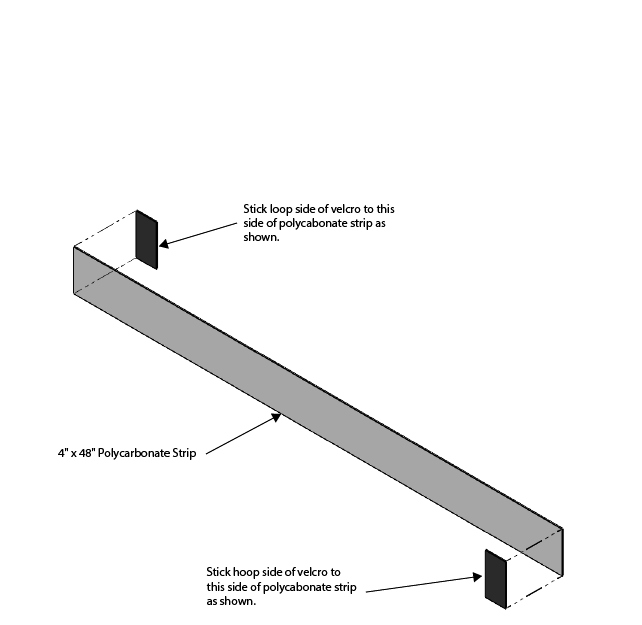
Figure 5a
------------------------------------------------------------------------------------------------------------------------------------
Now apply the cut Velcro Branded strips to straightaway boards from Step 4, see Figure 5b.
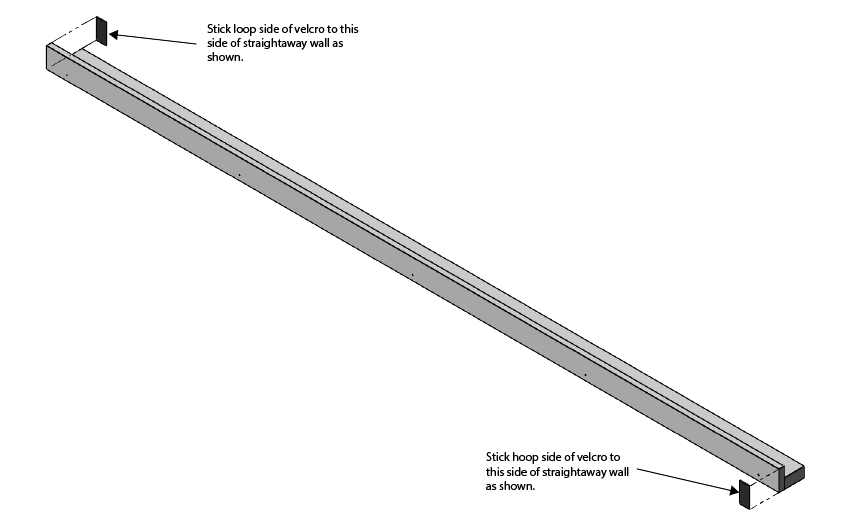
Figure 5b
---------------------------------------------------------------------------------------------------------------------
Now arrange the 4" x 48" Outer Wall Strips as shown in the Figire 5c. Start at the end of one straightaway wall and attach outer wall strip to straightaway board using the velcro strips you applied. Ensure hook side goes to loop side and ensure the panels are attached firmly at the joints.
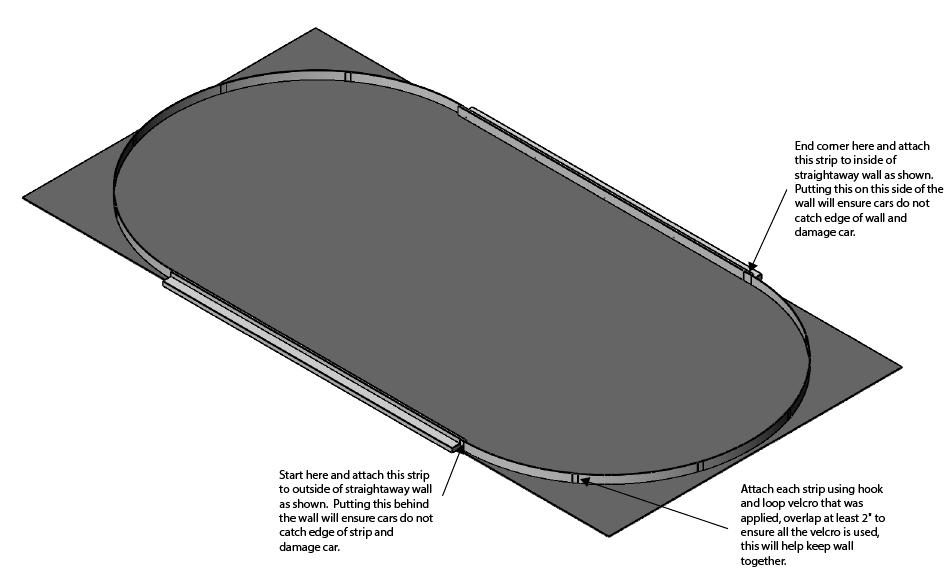
Figure 5c
----------------------------------------------------------------------------------------------------------------
Now with the outer walls in place, we need to add re-enforcement behind the walls to keep them from moving if a car hits them. Place the bricks or pavers as shown in Figure 5d. You may find you don't need as many bricks/pavers as we have shown but this is a good starting point.
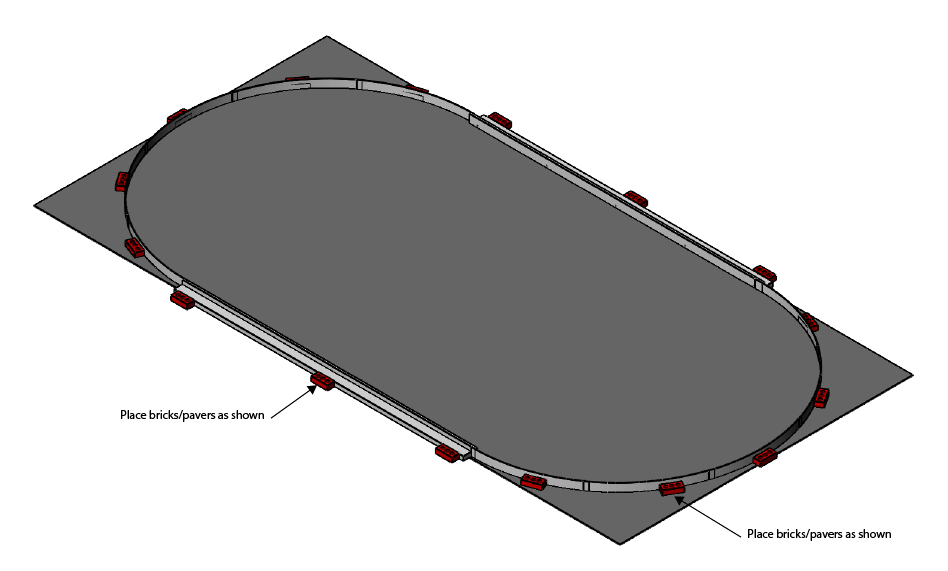
Figure 5d
At this point we have one critical step in the track building process. This critical step is to make sure you have your battery on the charger and your car is ready to go, after the next step it is time to gas it up and turn left!
Step 6:
In this step we will cut the 1/8" White Hardboard to make the inside of the corners. Before cutting these, we need to draw some lines so you can follow those lines. When you draw the lines on the board, draw everything on the back side or non-white side, this will help the white side edge from chipping when cutting. Refer to Figure 6a for all the needed cut lines. We recommend that you wear a dust mask when making the cuts and to wear safety glasses. Do all cutting in a safe open space away from others. After you are done with the cuts, use a file or sandpaper to smooth out the edges on both sides where the cuts were made. Doing so, will help prevent any damage to the cars if you run the cars on and off the boards.
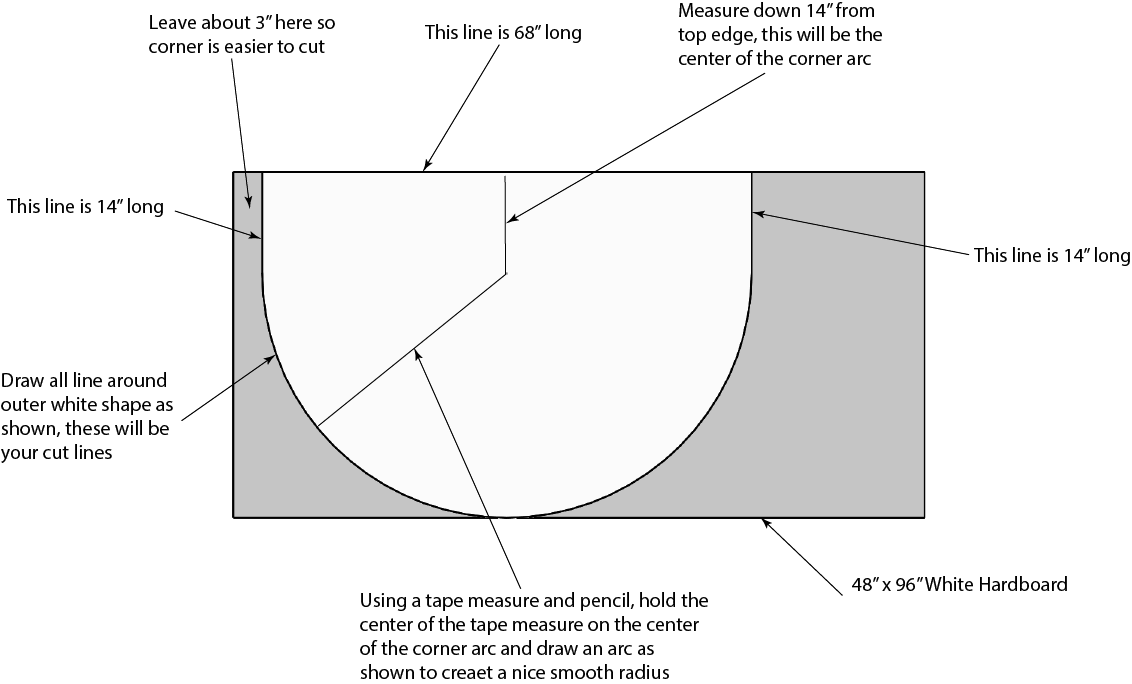
Figure 6a
-----------------------------------------------------------------------------------------------------------------
Now place the two inside corners as shown in Figure 6b. Center the inside corner pieces as shown so the racing lanes are the same all the way around the corners. The inside corner pieces should be heavy enough to stay in place but if they move, you can apply the hook side of the velcro to the underside of the corners to help keep it in place. If your track is on the floor where people can walk across the track, we recommend adding the velcro on the underside of the inside corner pieces so they do not move and cause people to slip.
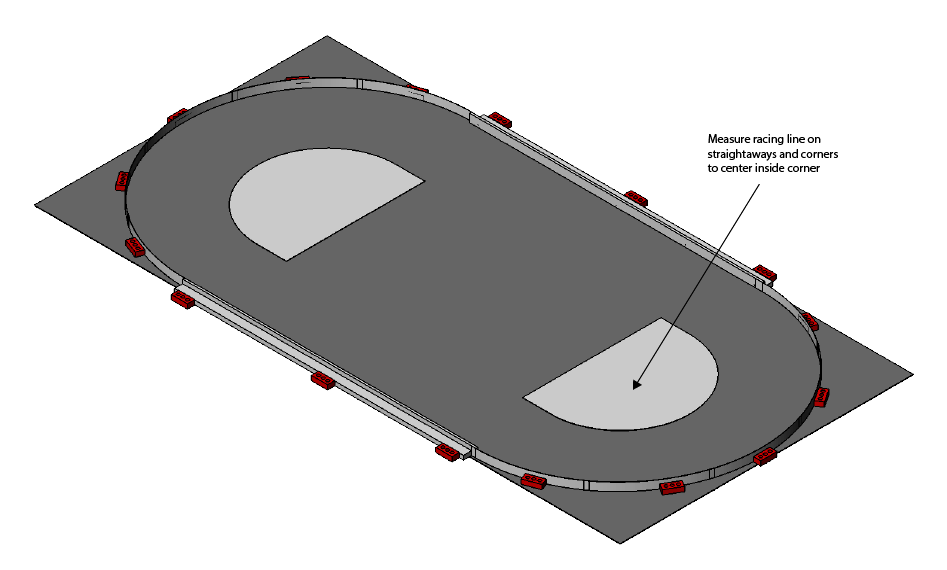
Figure 6b
Now for the best part, put that battery in the car, turn on the radio and car and go racing around your new oval track.
Step 7: - Optional
Now that your track is completed we have a couple optional additions you may want to add to your track.
Option 1:
We recommend adding a start/finish line. For this you can usually find some checker board and other styles of duct tape at your local hardware store. We recommend using the tape for this as it is easily replaced and also moved around as needed.
Option 2:
Another option is to add an automated lap counter system. There are a couple different units on the market but be aware, some of these can be expensive. If you keep the races short and quick with not many racers, you can do your scoring by hand counting. If you are going to have longer races and more people at your track we recommend getting a lap counter. To find lap counting systems, do an internet search for "RC Car Lap Counter System" to see a few options. The cars are setup with an extra port on the ESC/Rx to plug in a transponder as needed.
Have fun and be sure to post pictures of your track on our social media pages.
WARNING: 1 RC Racing, LLC is not responsible for any damage or injuries that occur on your track to the cars, persons or property. You as the track owner and track builder, you assume all responsibility for your track. All information above is only a recommendation for building your track. You as the track owner assume all responsibilities for your track.
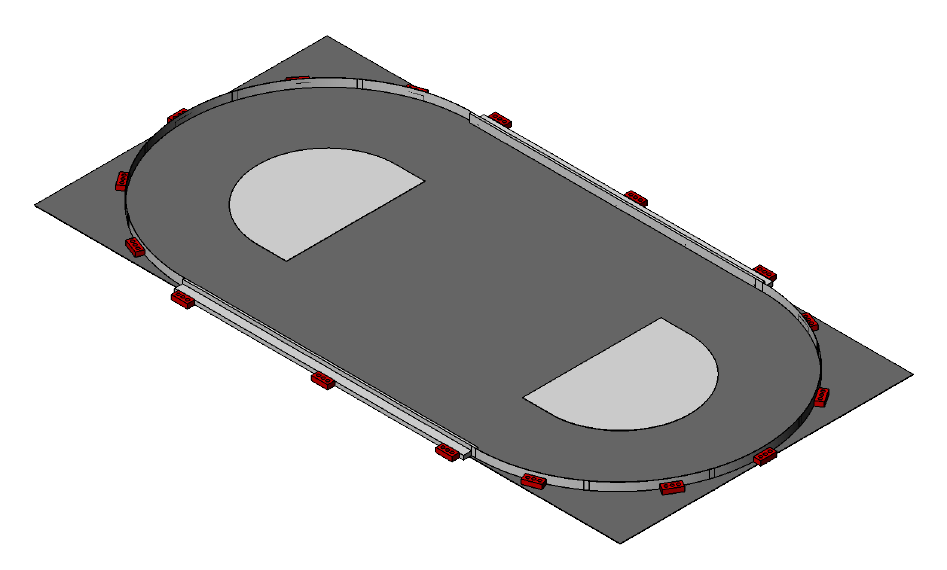
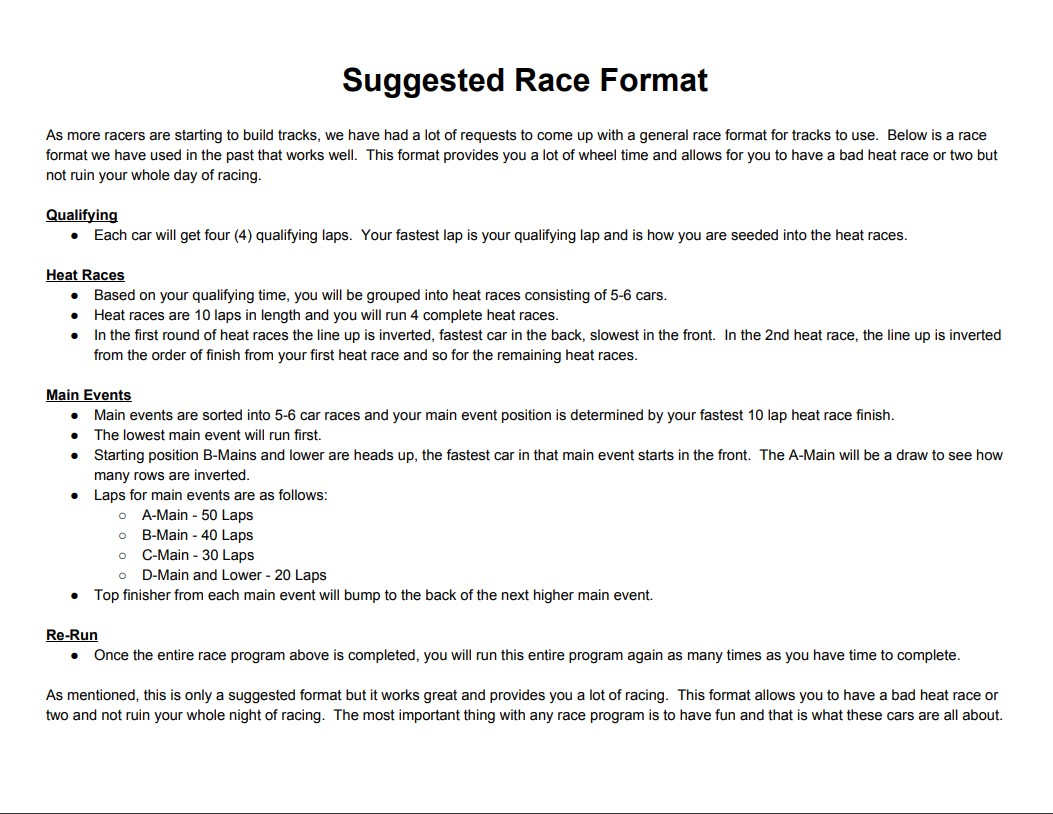
Find a Suggested Rules Package on our website at www.1rc-racing.com
